Introduction to Sci-SDK
If you’re a scientist or engineer working with scientific data, you know how important it is to have reliable and efficient tools for data readout and analysis. The Sci-SDK is a library that allows users to interface with hardware boards running firmware developed with SciCompiler, providing USB or Ethernet access to any element within the firmware for the purpose of reading or writing data.
Here are some of the advantages of using Sci-SDK for your data acquisition and readout needs.
Hardware-agnostic
One of the key advantages of Sci-SDK is that it is hardware-agnostic. This means it can interface with any CAEN Open hardware board that is compatible with SciCompiler, allowing you to work with a wide variety of data acquisition hardware. Whether you’re working with a CAEN digitizer, scaler, or other data acquisition hardware, Sci-SDK provides a unified API for accessing the data.
Flexibility and Scalability
Sci-SDK is designed to be flexible and easily adaptable to various applications, allowing developers to create robust solutions for a wide array of projects. Furthermore, the library is highly scalable, making it suitable for both small-scale experiments and large, complex systems.
Another advantage of Sci-SDK is that it includes drivers for all memory-mapped readout blocks offered by SciCompiler. This means you don’t need to know how to access the data or configure the readout blocks yourself. The drivers provide a high-level interface for accessing the data, making it easy to integrate into your existing software.
Easy-to-use interface
Sci-SDK provides a user-friendly interface that makes it easy to import, visualize, and analyze data. You don’t need to be an expert programmer or data analyst to use Sci-SDK effectively. The library includes a variety of functions for working with data, such as importing data from files or memory, reading and writing data to and from hardware devices, and analyzing data using a variety of algorithms.
Comprehensive examples and documentation
Sci-SDK comes with comprehensive documentation for every element of the library, including examples of code and related firmware. For each driver, and therefore for each readout block offered by SciCompiler, there are examples with increasing difficulty, starting from a simple boilerplate that shows how to use the readout element alone, up to complete applications and related firmware that can not only read data but also analyze it (e.g., MCA with fitting tools on the spectrum). This makes it easy to get started with Sci-SDK and to learn new techniques as you go.
Free and open-source
Sci-SDK is an open-source project that is freely available to anyone. This means you can use it without any licensing fees or restrictions, and you can even contribute to the project and help improve it. It’s available on Gitlab
How does it work?
The Sci-SDK library is designed to connect to several different devices, each with an independent readout library. The Sci-SDK acts as a wrapper for the board-specific readout libraries, providing a common interface to access the hardware. For example:
- The V/DT274X has a readout library called FELib.
- The DT1260 has a readout library called SciDKSDK.
- The DT555XX family has a readout library called NiUSB30.
- The R/DT5560X family has a readout library called R5560SDK.
Each of these libraries is itself an SDK for the specific board, with different functions to access registers, read/write memory, and read/write FIFOs. The Sci-SDK wraps all of these board-specific functions and provides a common interface to access the hardware. This allows you to connect to different boards at the same time with the same application and with just one library, and to use the same functions to access the hardware.
The Sci-SDK is not just a wrapper for the underlying board-specific library. It also includes functions to readout and configure memory-mapped components generated by SciCompiler. The Sci-SDK includes drivers for all memory-mapped components generated by the SciCompiler, which make it easy to access the data. The user doesn’t need to know how to access the hardware to readout the data - they just need to know the path of the element and the properties of the element to be configured.
The Sci-SDK file structure includes a shared library (.so) or dynamic library (.dll) that is loaded at runtime, along with specific board-specific libraries required for each device. When installed on Windows or Linux, these files are copied to the system path or installation folder.

Support all modern programming languages
The world of programming is continuously evolving, with new languages and libraries emerging to meet the diverse needs of developers. One such powerful library is Sci-SDK, which has been meticulously designed to support a wide range of modern programming languages, including C, C++, C#, VB.NET, Python, Java, Labview, Matlab, Octave, and ROOT. This comprehensive support allows developers to harness the full potential of the library in the language they are most comfortable with, making the development process more efficient and versatile.
Although the Sci-SDK library is designed to support multiple programming languages, its utilization remains consistent across different languages. Let’s explore how the library can be implemented in some of the popular programming languages.
-
C and C++: Sci-SDK provides C and C++ developers with a set of header files and libraries that can be easily integrated into their projects. These headers and libraries offer access to various data structures, functions, and algorithms, allowing developers to efficiently work with complex scientific data.
-
C# and VB.NET: For .NET developers, Sci-SDK offers a set of class libraries that can be seamlessly incorporated into C# and VB.NET projects. The libraries provide access to a wide range of functionality, including data acquisition, processing, and visualization.
-
Python: Python developers can take advantage of Sci-SDK by using the provided Python packages, which expose the library’s functionalities through Python modules and classes. This allows Python developers to easily integrate the power of Sci-SDK into their projects, benefiting from its high-performance capabilities. SciSDK library is available on PyPi and can be installed with pip
-
Java: The Sci-SDK library offers Java developers a a Java packages that can be installed in an Ant managed project or a Maven project.
-
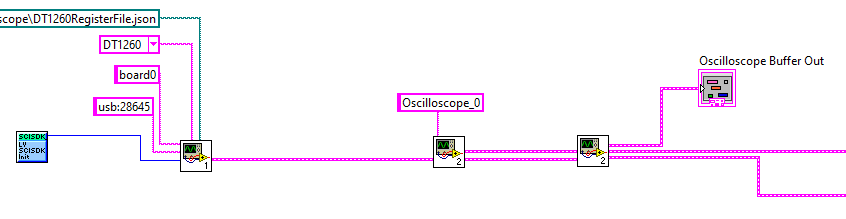
LabVIEW: For LabVIEW users, Sci-SDK provides a set of VIs (Virtual Instruments) that can be easily incorporated into LabVIEW projects. These VIs grant access to he library’s features, enabling LabVIEW developers to effortlessly harness the power of Sci-SDK in their applications.
-
Matlab and Octave: Matlab and Octave users can leverage Sci-SDK through the provided examples, which demonstrate how to use the library’s features in Matlab and Octave. These examples can be easily adapted to suit the needs of the user, allowing them to quickly integrate Sci-SDK into their projects.
-
ROOT: ROOT developers can take advantage of Sci-SDK’s support by incorporating the library’s header files and linking the necessary libraries to their projects. Examples are provided to demonstrate how to use the library’s features in ROOT, making it easy to get started with Sci-SDK.
Consistency Across Programming Languages
A key aspect of Sci-SDK’s design is its consistent usage across various programming languages. The library’s developers have ensured that the integration process and usage patterns remain uniform across different languages, making it easy for developers to switch between languages or collaborate with colleagues who use different languages.
Some of the factors that contribute to the library’s consistency across languages include:
-
Similar Function Signatures: Sci-SDK’s functions and methods have similar signatures and naming conventions across different languages, allowing developers to effortlessly adapt their code when switching between languages.
-
Consistent Data Structures: The data structures provided by Sci-SDK are designed to be uniform across different programming languages, ensuring that developers can work with the same data types and structures regardless of their language choice.
-
Comprehensive Documentation: The extensive documentation provided for Sci-SDK covers each supported language, offering detailed information on integration, usage, and troubleshooting. This documentation ensures that developers have access to consistent guidance and support, regardless of their language preference.
Read-out waveform from a digitizer
This code snippet shows how to use the Sci-SDK library to read data from a Oscilloscope generated by SciCompiler in different programming languages.
SCISDK_SetParameterString("board0:/MMCComponents/Oscilloscope_0.trigger_mode", "self", _sdk);
SCISDK_SetParameterInteger("board0:/MMCComponents/Oscilloscope_0.pretrigger", 150, _sdk);
SCISDK_SetParameterInteger("board0:/MMCComponents/Oscilloscope_0.decimator", 0, _sdk);
SCISDK_SetParameterString("board0:/MMCComponents/Oscilloscope_0.data_processing", "decode", _sdk);
SCISDK_SetParameterString("board0:/MMCComponents/Oscilloscope_0.acq_mode", "blocking", _sdk);

SCISDK_OSCILLOSCOPE_DECODED_BUFFER *ob;
SCISDK_AllocateBuffer("board0:/MMCComponents/Oscilloscope_0", T_BUFFER_TYPE_DECODED, (void**)&ob, _sdk);

SCISDK_ReadData("board0:/MMCComponents/Oscilloscope_0", (void *)ob, _sdk);
sdk->SetParameter("board0:/MMCComponents/Oscilloscope_0.trigger_mode", "self");
sdk->SetParameter("board0:/MMCComponents/Oscilloscope_0.pretrigger", 150);
sdk->SetParameter("board0:/MMCComponents/Oscilloscope_0.decimator", 0);
sdk->SetParameter("board0:/MMCComponents/Oscilloscope_0.data_processing", "decode");
sdk->SetParameter("board0:/MMCComponents/Oscilloscope_0.acq_mode", "blocking");

SCISDK_OSCILLOSCOPE_DECODED_BUFFER *ob;
int res = sdk->AllocateBuffer("board0:/MMCComponents/Oscilloscope_0", T_BUFFER_TYPE_DECODED, (void**)&ob);

sdk->ReadData("board0:/MMCComponents/Oscilloscope_0", (void *)ob);
sdk.SetParameterString("board0:/MMCComponents/Oscilloscope_0.data_processing","decode")
sdk.SetParameterString("board0:/MMCComponents/Oscilloscope_0.trigger_mode","self")
sdk.SetParameterInteger("board0:/MMCComponents/Oscilloscope_0.pretrigger", 150)
sdk.SetParameterInteger("board0:/MMCComponents/Oscilloscope_0.decimator", 0)
sdk.SetParameterString("board0:/MMCComponents/Oscilloscope_0.acq_mode", "blocking")

res, buf = sdk.AllocateBuffer("board0:/MMCComponents/Oscilloscope_0")
res, buf = sdk.ReadData("board0:/MMCComponents/Oscilloscope_0", buf)
// C# Example:
sdk.SetParameter("board0:/MMCComponents/Oscilloscope_0.trigger_mode","self");
sdk.SetParameter("board0:/MMCComponents/Oscilloscope_0.pretrigger", 150);
sdk.SetParameter("board0:/MMCComponents/Oscilloscope_0.decimator", 0);
sdk.SetParameter("board0:/MMCComponents/Oscilloscope_0.data_processing","decode");
sdk.SetParameter("board0:/MMCComponents/Oscilloscope_0.acq_mode", "blocking");

SciSDKOscilloscopeDecodedBuffer buffer;
buffer = new SciSDKOscilloscopeDecodedBuffer();
sdk.AllocateBuffer("board0:/MMCComponents/Oscilloscope_0", BufferType.BUFFER_TYPE_DECODED, ref buffer);
if (sdk.ReadData("board0:/MMCComponents/Oscilloscope_0", ref buffer) == 0)
{
    // do something with the buffer
}
' VB.NET Example:
sdk.SetParameter("board0:/MMCComponents/Oscilloscope_0.trigger_mode","self")
sdk.SetParameter("board0:/MMCComponents/Oscilloscope_0.pretrigger", 150)
sdk.SetParameter("board0:/MMCComponents/Oscilloscope_0.decimator", 0)
sdk.SetParameter("board0:/MMCComponents/Oscilloscope_0.data_processing","decode")
sdk.SetParameter("board0:/MMCComponents/Oscilloscope_0.acq_mode", "blocking")

dim buffer as SciSDKOscilloscopeDecodedBuffer
sdk.AllocateBuffer("board0:/MMCComponents/Oscilloscope_0", BufferType.BUFFER_TYPE_DECODED, buffer)
if (sdk.ReadData("board0:/MMCComponents/Oscilloscope_0", buffer) == 0) then

end if
res = sdk.SetParameterString("board0:/MMCComponents/Oscilloscope_0.data_processing", "decode");
res = sdk.SetParameterInteger("board0:/MMCComponents/Oscilloscope_0.trigger_level", 1500);
res = sdk.SetParameterString("board0:/MMCComponents/Oscilloscope_0.trigger_mode", "self");
res = sdk.SetParameterInteger("board0:/MMCComponents/Oscilloscope_0.trigger_channel", 0);
res = sdk.SetParameterInteger("board0:/MMCComponents/Oscilloscope_0.pretrigger", 150);
res = sdk.SetParameterInteger("board0:/MMCComponents/Oscilloscope_0.decimator", 0);
res = sdk.SetParameterString("board0:/MMCComponents/Oscilloscope_0.acq_mode", "blocking");

// allocate buffer
Ref<OscilloscopeDecodedBuffer> buf = new Ref<>(new OscilloscopeDecodedBuffer());
res = sdk.AllocateBuffer("board0:/MMCComponents/Oscilloscope_0", buf);

if(res == 0) {
    res = sdk.ReadData("board0:/MMCComponents/Oscilloscope_0", buf);
}
// set digitizer parameter
ret = SCISDK_SetParameterString("board0:/MMCComponents/Oscilloscope_0.data_processing", "decoded", sdk);
ret = SCISDK_SetParameterInteger("board0:/MMCComponents/Digitizer_0.trigger_level", 1500, sdk);
ret = SCISDK_SetParameterString("board0:/MMCComponents/Oscilloscope_0.trigger_mode", "self", sdk);
ret = SCISDK_SetParameterInteger("board0:/MMCComponents/Oscilloscope_0.trigger_channel", 0, sdk);
ret = SCISDK_SetParameterString("board0:/MMCComponents/Oscilloscope_0.acq_mode", "blocking", sdk);

SCISDK_OSCILLOSCOPE_DECODED_BUFFER* odb;
ret = SCISDK_AllocateBuffer("board0:/MMCComponents/Oscilloscope_0", T_BUFFER_TYPE_DECODED, (void**)&odb, sdk);
if (ret == NI_OK) {

  // read data and plot graph with ROOT
  ret = SCISDK_ReadData("board0:/MMCComponents/Oscilloscope_0", (void*)odb, sdk);

  if (ret == NI_OK) {
    TApplication theApp("Oscilloscope", NULL, NULL);
    Int_t n = odb->info.samples_analog;
    Double_t* x, * y;

    x = (Double_t*)malloc(odb->info.samples_analog * sizeof(Double_t));
    y = (Double_t*)malloc(odb->info.samples_analog * sizeof(Double_t));

    for (int i = 0; i < odb->info.samples_analog; i++)
    {
      x[i] = i;
      y[i] = odb->analog[i];
    }
    // create graphs
    TGraph* gr3 = new TGraph(odb->info.samples_analog, x, y);
    gr3->SetTitle("Oscilloscope");
    TCanvas* c1 = new TCanvas("c1", "Graph Draw Options", 200, 10, 600, 400);

    c1->cd(4);
    gr3->Draw("APL");
    c1->Update();

    theApp.Run();

    free(x);
    free(y);
  }
}